Friday, June 19, 2020

I created my very own pop-up elements

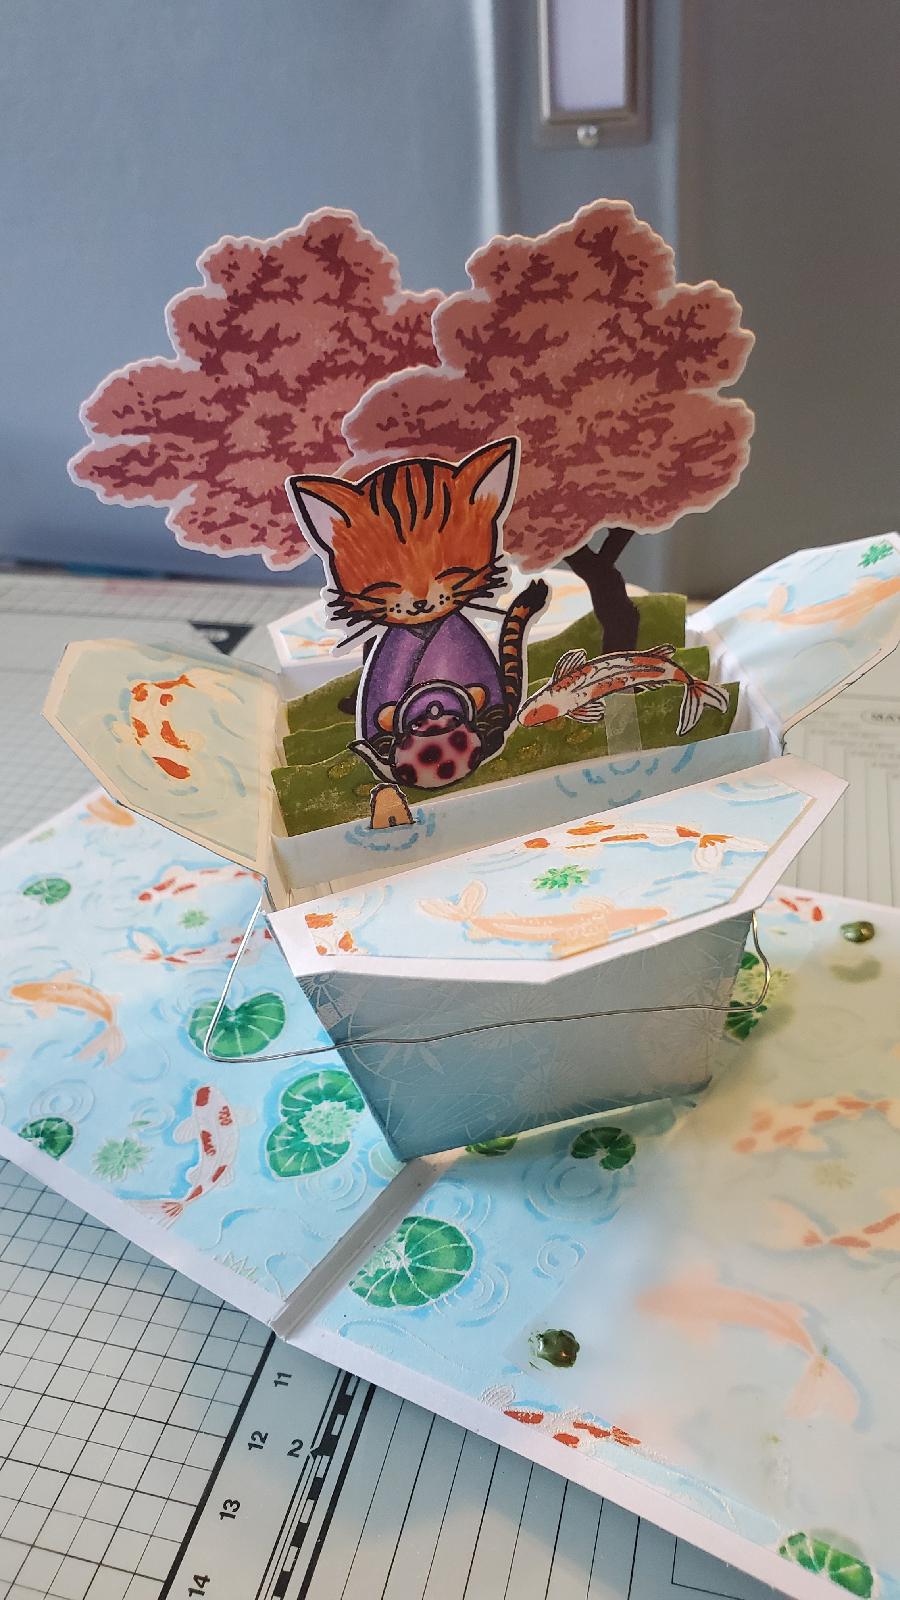
Hi. I'm very excited to share this card with you! I created my first ever pop-up card using the March My Monthly Hero Arts kit and add ons. My daughter's birthday was the beginning of March but I was late in getting a card out to her. As I was trying to figure out what to make, I saw a blog showcasing this set. I knew I had to order it just for her. It is perfect. She loves Japanese Anime and she loves Chinese elements. She also dearly loved cats. My order arrived and I put together this scene on the front:
All the inking and coloring is done with a blend of Altenew inks (trees and shrine), Distress Inks (sky), Stampin' Up (grass), and Copics (koi pond and cats). I also used a cloud stencil for the sky.

The inside was trickier and way more time consuming. I love making interactive cards. My favorite is a shaker, but I didn't really want to make that. In thinking about Chinese elements I thought, "wouldn't it be cool if I could put a pop-up Chinese takeout box in the center." I remembered that I have an Origami Owl container that looks exactly like that. I got it and was delighted to find that it came appreciate in one piece. I thought "Awesome!!!! I can trace it, cut it out, and I'll have my element." So I did that. I cut the bottom out so that it would collapse and did all the folding. It was very thick on the sides. I didn't like it. I cut it apart so that I would have only one layer of each triangular piece instead of two. Much better. Plus I could angle it to look more like a container. 
I made templates so that I can do this again. I'm sure there's probably a die or there somewhere, but I have no idea where and I didn't have one available to use. This was a fun experience anyway and I am very proud of myself. I made it to big for a scene, but all I have to do is shrink down my templates on my copier and I should be good for another go around. Originally, the plan was to do "noodles" and chopsticks, but I couldn't figure out a good way to do noodles. After I got it put together I glued pieces to it so that it would attach to the card base. I put pieces inside to make it like a box card. It is decorated using the March add on background stamp Parasol Pattern Bold Print with the koi pond on the flaps to go with the scene. I did white heat embossing and colored it with Tumbled Glass and Broken China Distrss inks. To hide the attaching arms I stamped two panels with the add-on Koi Pond Bold Patterns. Again, I white embossed but colored with Copics. I cut slits where the arms would come up though and carefully inserted the arms and glued them down. I could then glue down the panel. A little of the arm showed on one side, but coloring it to match the water made it unnoticeable. The kittens and coordinating dies are also add ons and are called Kittens in Kimonos.

I didn't want to hide my fish so my sentiment went onto vellum. I tried to use Nuvo drops on the corners to hide adhesive but it was so thick that I had trouble with it. I'm going to have to contact the company to see what I can do. This post is long so I will end with the pictures. I like it. I hope you do too. The box scene is finished by using markers and a light pad to create backs to the front of everything so that it would look good from any angle. I attached the jumping fish on a small piece of acetate and inserted another fish to make it look like he was peeking out of the water. 
I am entering this in this months Hero Arts challenge "Make A Scene" over on their blog


Sunday, March 29, 2020

My Card for the LaLa Land Crafts Card Swap

I subscribe to LaLa Land's email newsletters. I got a post about the card swap that Irina was putting together using their products. I love doing these so I sent her a message "I'm in!" After receiving my swap partner's info, I went in and pulled out my LaLa Land Crafts products. Almost everything was Christmas themed. I'm like, "Oh no! What am I going to do with that?" The only stamp set that I have is this one with caroling mice on it and a Christmas postcard set.  Everything else I have are dies, papers, and Digi images (that I have no way to print right now). Thankfully I found a pocket die and a tag set (hmmm, I can use those). I pulled out some other things that I thought I could turn in to a non-Christmas card. Then I came to the typewriter and the creative juices started flowing. Some of the mice are holding songbooks. Why can't they be regular books? Ding Ding Ding! Books and typewriters go perfectly together. What to use as a sentiment, since I don't have any? As you can see, I didn't really use one. I have an old set from HeroArts that had a friend block. I stamped that on a piece of scrap paper and cut off a small piece to tuck into the typewriter. Now, what kind of paper can I use? I opened the 6x6 paper pads that I bought at Christmas. Thankfully this set had some prints that could work for any time off the year. (Thanks for that designers) I really like how the pages in this pack coordinate perfectly with each other. I cut out my pocket and my tag. The white piece of my tag was actually cut with the smaller tag off the set. I just cut off the rounded part. The bad thing about that was that there was no sticking on that side. I figured it would be less noticeable at the bottom. I stamped the HeroArt block again on this. I made Irina's signature frame on the inside because it gives a touch of class and looks great on her cards. Another typewriter and more of that piece of stamping from the front. Did my inside. I try to add glitter whenever I can because it's my favorite thing. Nuvo glitter drops worked to cover the key holes on the typewriters.

I was really pleased with this. I've listed the supplies under the pictures.


La-La Land Crafts Supplies used:
Little Merry Christmas 6x6 paper pack
A Caroling We Go stamp set
Curved Pocket Die
Large Stitched Tags Die Set (2 smallest tags)
Small Hal Doily die
Vintage Typewriter die
Hero Arts Original Definitions stamp set
Copics
Aquatic Mist Nuvo Glitter Drops

Thanks for stopping by. Hope you're staying safe and healthy!


Wednesday, March 11, 2020

New card featuring Altenew products

I actually made this in January as a reveal party card for our Prayer Partner reveal dinner at church. It's like Secret Pal. We randomly choose a name from the forms of those participating. We pray for them all year. We can also give cards and small gifts throughout the year. I don't get to make cards through the year because I'm the only one who does home-made cards, so my partner would know it was me: ( I always try to make one for the revealing because my name would be on it anyway. This year I almost forgot so I fairly quickly (for me) made this one. It was last minute and made us late for the dinner.


I sprayed a piece of white cardstock with Altenew Soft Lilac shimmer spray. After it dried, I covered the bottom with Altenew Gilded Ombre Washi tape. The images are Altenew's Dotted Blooms and Versatile vases. The flower was cut out with the coordinating die. The vase was fussy cut with scissors.The sentiment was stamped on vellum. I added dewdrops for interest.

I am linking this to the Altenew Educator linky party.

Tuesday, March 3, 2020

Birthday card using Hero Arts June 2019 add ons

My grandson turned four on January 28th. I love making fun interactive cards for my two grandchildren and shaker cards are my favorite to make. I bought the fun June 2019 kit from Hero Arts and some of the add ons  and decided to use them. I have an obsession with buying supplies but then I don't use them. I also went out of my comfort zone to try using water color paints from Altenew. I'm not very good at using them. The monkeys turned out ok but I did not really like the frame die. I'm thinking that maybe I should have diluted the paint with more water before I smooshed. I think these monkeys are really cute and wanted to make it look they were swinging on vines to match the sentiment. I strategically glued the vines under the frame. I had to fussy cut the monkeys so that I could hang them from the vines. On the inside, I used two different sentiments to turn it into a birthday saying. I forgot to take a picture before I hand wrote the message, so you have to look at my sloppy writing. The sequins were from my stash and probably came from Pat Catan's. Unfortunately, that store had since closed.

Main Items used:
         Hero Arts Jungle Fancy Frame Die
         Hero Arts Thanks a Bunch  Monkeys w
          coordinating dies


Thanks for stopping by.

Friday, December 6, 2019

My Last Entry for the 25 Days of Christmas Tags


This is my final attempt at participating in Tracey McNeely's 25 Days of Christmas Tags. This snow globe is able to be used as an ornament, which is my intention. This is going to be my contribution for the stockings at our annual family gathering. I believe I have to make 14 of these. These were made using Stampin Up products. My demonstrator, Robyn Cardon, sent me a holiday catalog. When I saw these products, I knew I had to have them. I love making shakers and snow globes are fantastic. I used the Snow Globe Scene Dies and the Snow Globe Shaker Domes. There is a coordinating Stamp set, but I did not use it. It is called Still Scenes and includes a sentiment for both the inside and outside of a card. I think that is great because you don't find that very often in a set. Because Stampin Up was not a sponsor for any of the days of tags it was difficult to really put it in any particular day. There were days that used reindeer and days that used shakers. The Lawn Fawn day had a lot of shaker snow globes so it kind of fits in there. I don't have products by a lot of the sponsors, so I had to use what I had. I really enjoyed every tag and just wanted to participate as much as possible. Thanks Tracey for a month of fun and inspiration!

In my Instagram post I said that I mimicked a You Tube tutorial. When I received these snow globe items I wanted to make sure I used them properly. I watched several tutorials. I liked this design so I tried to copy it and just put my own spin on it. I don't know how to post the link to the video but if you search Stampin Up snow globe shaker Domes you will find it. It is done by Pretty In Paper Crafts with Tiffany Almeida.

Thanks for stopping by.

Here's a link that will take you to Day One of all the fun: https://inmycreativeopinion.blogspot.com/2019/11/the-25-days-of-christmas-tags-2019-day-1.html?m=1

Thursday, December 5, 2019

25 Days of Christmas Tags: My Lawn Fawn Tag

I fell in love with this tag by Maine Simon over at Tracey McNeely's 25 Days of Christmas Tags day 21 sponsored by Lawn Fawn. I ordered all of the products and made my own following her video tutorial. The only real differences are that I added a gingerbread man and put glossy accents on the candy after adding glitter with my gellyroll Stardust pen. I suffer from hand tremors and so things didn't work out quite as neatly as hers did, but for a first attempt at something so small I was satisfied.

Here is the link to Maine's blog so you can see her tag and video:  https://bluemarinecraft.blogspot.com/2019/11/25-days-of-christmas-tags-with-lawn-fawn.html?m=1

Here is the link to Tracey's post for day 21:
http://inmycreativeopinion.blogspot.com/2019/11/the-25-days-of-christmas-tags-2019-day_24.html?m=1

Thanks for stopping by.

Thursday, November 28, 2019

25 Days of Christmas Tags: Simon Says Stamp Inspiration


Here is one more tag for Tracey's 25 Days of Christmas Tags. This one is inspired by Shari Carroll of Simon Says Stamps which sponsored day 10. I love her work plus she used several Tim Holtz elements. I used a Sizzix 3D snowflake embossing folder. I sprayed the cardstock with Altenew iridescent spray to make it shiny. I used my Tim Holtz snowflake rosette die, shapers and movers small poinsettia, the smallest of the Tattered Poinsettia big die flowers, rock candy glitter, a word band (which happens to be my favorite Christmas movie), and long fasteners. Oh, and I inked the poinsettia with Distress Ink-Peeled Paint, Worn Lipstick, and Vintage Photo.

Here's a link to Day 10 so that you can see all of the great tags. You have to click on the link to SSS blog to see Shari's tag and video.
https://inmycreativeopinion.blogspot.com/2019/11/the-25-days-of-christmas-tags-2019-day.html?m=1